The heat, pressure, and force that materials experience during manufacturing processes, such as forming, casting, and molding, can cause internal inconsistencies in manufactured metal parts. These inconsistencies include distortions and uneven microstructures, or “strain,” which can lead to the parts cracking and failing.
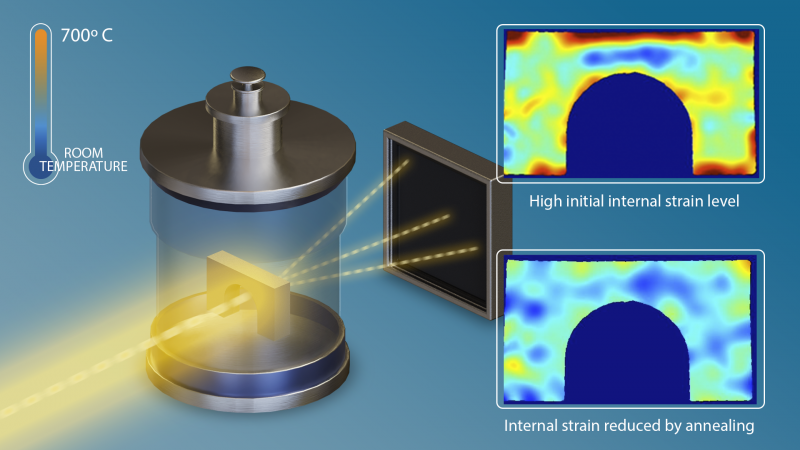
Reducing internal strain in manufactured parts is why post-build heat treatments, such as annealing, are common. Annealing involves heating manufactured parts to high temperatures to decrease, or relieve, internal stress.
GE Global Research and University of California at Berkeley scientists are working on improving production models that help better design and heat treat parts. In a recent study, they focused on parts made using additive manufacturing (AM) techniques, where 3-D parts are built up, or “printed,” layer by layer. They analyzed internal stress formation associated with AM processes during neutron experiments at the US Department of Energy’s (DOE’s) Oak Ridge National Laboratory (ORNL). The results, titled, “Monitoring residual strain relaxation and preferred grain orientation of additively manufactured Inconel 625 by in-situ neutron imaging,” are published in Additive Manufacturing.
The study involved parts manufactured using laser-based AM, which employs a laser to melt and deposit a structural material. The melted material—typically starting as a powdered metal or plastic—quickly cools and hardens before another layer is deposited on top of it.
Laser-based AM can also cause internal strain due to the rapid heating and cooling during the build process. Annealing can reduce the internal stress, but too much heat can cause unwanted structural changes in the material.
Using neutron diffraction at ORNL’s VULCAN beamline, the researchers measured high internal residual strain inside as-built samples of Inconel 625, a common metal alloy. A complementary technique, neutron imaging, was then used at ORNL’s SNAP beamline to measure—in real time—how annealing the parts reduced the internal stress. Initial calibration experiments were performed at the NOBORU beamline at the Japan Proton Accelerator Research Complex (J-PARC).
“When using laser AM, the top layer that is being melted is very hot, while the lower layers have cooled. This temperature variation can create internal stresses that can lead to cracking,” said Ade Makinde, a principal engineer at GE Global Research. “Neutrons helped us look through the furnace walls in real time during the annealing process. We observed where the stress was reduced in the material during heating and at what temperature. It’s a balancing act. We need to heat the material to reduce the stress, but avoid temperatures that are too high to prevent unwanted structural changes.”
The data obtained is helping GE improve its computer modeling of production processes to reduce or eliminate mechanical failures in printed components. For example, the model can show how changing the shape of a part can make it stronger by minimizing internal stress occurring during production. It can also indicate if changing the width of the laser beam or the speed at which the laser travels can improve production quality.
“Neutron imaging at the SNAP beamline facilitated the experiment as only a few neutron facilities worldwide can do,” said Anton Tremsin, a full research physicist at UC Berkeley. “Yes, x-ray diffraction measurements can monitor strain relaxation at specific points. However, neutron imaging lets us look at the entire bulk material simultaneously, in real time, with very high spatial resolution. The data will help us develop instrumentation and data analysis methods for new, non-destructive testing techniques.”
The team annealed each of the 3-D printed parts in a vacuum furnace for several hours at either 1,300° F or 1,600° F (700° C or 875° C). The neutrons easily penetrated the vacuum furnace walls and imaged the entire bulk part as the internal strain was relieved. Stress relief was complete within 1.0 to 1.5 hours at the lower temperature, while it took only a few minutes at the higher temperature.
“The amount and distribution of internal strain were related to laser beam speed, laser power, and other parameters during production,” said Ke An, lead instrument scientist for the VULCAN beamline at ORNL’s Spallation Neutron Source (SNS).” The experimental data is invaluable, along with a better understanding of how to anneal parts faster without reducing their structural integrity. It means that GE and other industry research partners can now confidently predict how to improve their product designs and production processes.”
“This research shows how industry, academia, and the DOE laboratories can collaborate on real-world challenges,” said Hassina Bilheux, lead imaging beamline scientist at ORNL’s High Flux Isotope Reactor (HFIR). “ORNL is the only facility in the US with the capability to provide the global neutron user community with complementary diffraction and neutron imaging techniques. We also offer high-speed data acquisition and analytical expertise.”
Bilheux added that the VENUS imaging beamline currently under construction at SNS will feature a wider range of neutron energies for users to work with. User experiments will also benefit from the more intense, 2.0-megawatt proton power of the upgraded SNS linear accelerator. “VENUS will enable enhanced imaging of structural and mechanical behaviors in devices operating in and exposed to extreme conditions such as heat and pressure. Users will also leverage unique, pulsed-sourced neutron imaging techniques to better understand a wider range of materials, manufacturing, and production processes.”
“At GE we are extremely happy with the data from these experiments and how easy it was to use the neutron facilities at ORNL,” said Makinde. “All the necessary equipment was already installed and calibrated at the beamlines, so, for example, we did not have to bring our own vacuum furnace. The furnace at the SNAP beamline maintained controlled temperatures and everything was synchronized to ensure accurate data acquisition.”
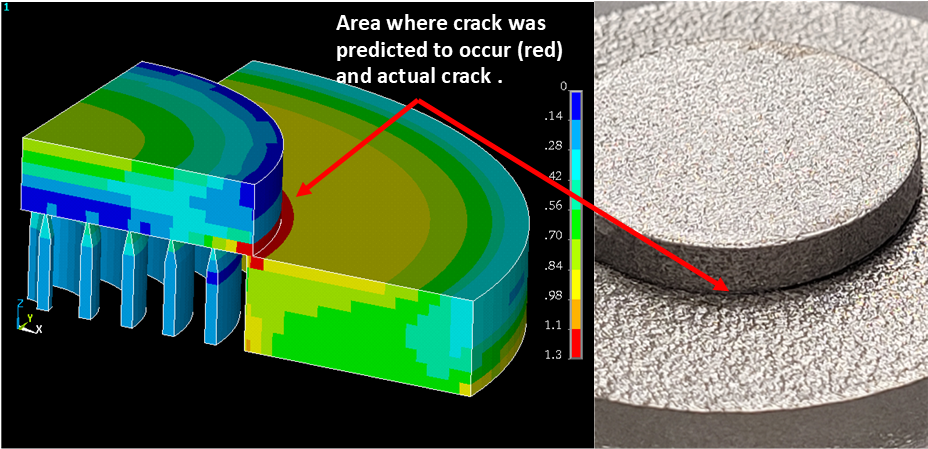
The scientists at GE are using the data to develop improved computer models that can help predict if and where 3-D printed parts might crack. They can then determine how reducing internal stress and optimizing designs can help prevent such defects.
The neutron research was supported by the DOE Office of Science, GE Global Research Center, University of California at Berkeley, and Japan Atomic Energy Agency.
The SNS and HFIR are DOE Office of Science user facilities. UT-Battelle LLC manages ORNL for the DOE Office of Science. The Office of Science is the single largest supporter of basic research in the physical sciences in the United States and is working to address some of the most pressing challenges of our time. For more information, please visit www.energy.gov/science. –by Paul Boisvert


